Reasons for bumps on the paper surface
What should you do if there are bumps on the paper surface after the large paper roll or rewinding? As shown in the figure below:
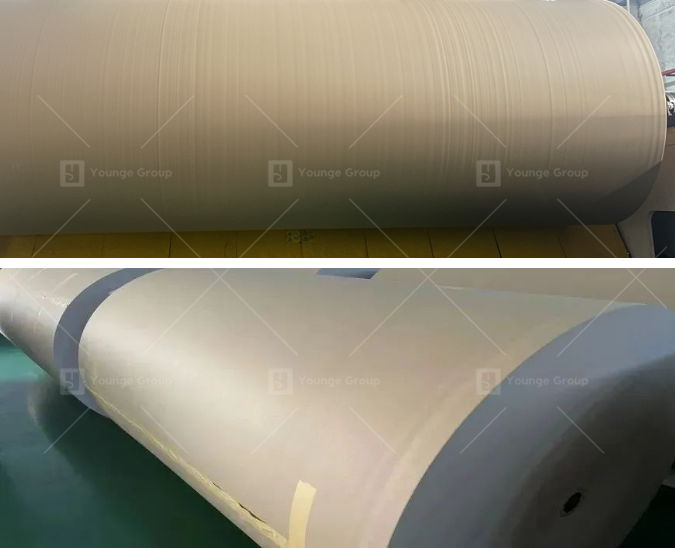
Paper roll with uneven marks on the surface
I believe many people have encountered similar paper defects, and it is also a very difficult problem to solve in reality. The bumps on the paper surface not only affect the appearance and quality of the product but also affect the customer’s use to some extent.
The deep reason for the bumps on the paper surface is that the data such as the horizontal quantitative and thickness vary. With the continuous rewinding of the paper reel, this difference continues to expand and finally manifests as bumps.
With the continuous increase in paper machine speed and the continuous expansion of width, the control accuracy of the horizontal quantitative and thickness of the paper is getting higher and higher, but sometimes it is inevitable that abnormalities will occur, resulting in the appearance of bumps.
There are many reasons for this problem. Today we will mainly discuss the reasons related to calender and flow forming.
Calender:
The function of the calender itself is to apply a certain pressure to the paper to trim the paper surface, give the paper better smoothness, glossiness and reduce the gap in the thickness of the entire paper. However, if the parameters of the actuator inside the calender are abnormal or the oil cylinder fails, it will bring negative effects. Not only will it not play a trimming role, but it will also amplify the existing abnormalities, such as making the bumps and grooves more obvious.
The method to check whether there is an abnormality in the calender itself is very simple, that is, to open the pressure zone of the calender and let the paper not be calendered. If the bumps and grooves on the rolled paper surface disappear, then the calender is abnormal, otherwise, there is no abnormality.
On the current wide-width paper machine, the inside of the calender roller is divided into many zones, and each zone can be individually pressured to achieve precise adjustment. As shown in the following figure:

Division diagram of pressure zones inside the calender roller
If the problem of bumps and concave marks is confirmed to come from the calender, then we can gradually check from the following 6 aspects:
- Whether there are any abnormalities in the installation data of the calender itself, and whether there is a “scissor hand” phenomenon after the upper and lower rollers are closed, these data can be detected using a total station.
The parameter setting screen of the calender roller
2. Whether the compensation of the calender roller is in a reasonable range: the compensation value of most paper machines is between 0-1. This value will be adjusted when the equipment leaves the factory and generally does not need to be adjusted again, but it must be checked and confirmed in the program.
3. Whether the current pressure curve is convex with high in the middle and low on both sides. If it is concave with low in the middle and high on both sides, it is necessary to focus on checking the compensation of the middle and high (as shown in the figure below).
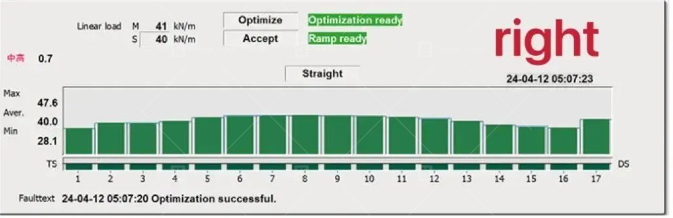
Normal situation: the pressure curve is convex with high in the middle and low on both sides
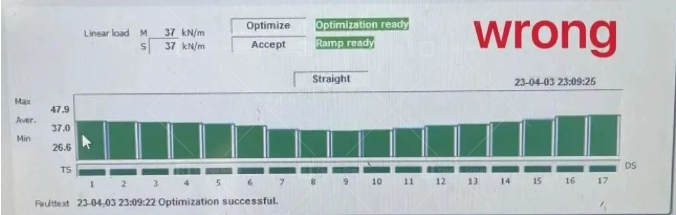
Abnormal situation: the pressure curve is concave with low in the middle and high on both sides
4. Measure the thickness of the finished paper in the cross direction (CD), focus on comparing the thickness of the concave and convex area with the thickness of the normal area, and then adjust the pressure of the corresponding area (pressurize when the thickness is large, and reduce pressure when the thickness is small) to make the thickness of the paper in the concave and convex area close to normal. In addition, special attention should be paid to the situation of the paper edge during adjustment to avoid the phenomenon of loose paper edge.
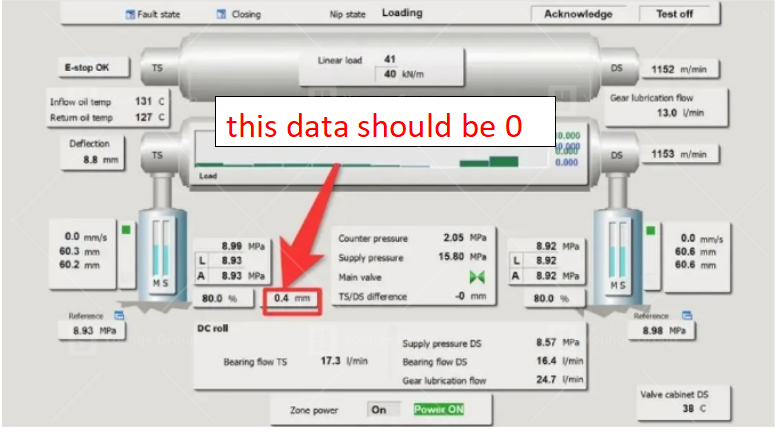
5. When adjusting the pressure, pay attention to whether the corresponding pressure value in the figure below changes. This can determine whether the internal oil cylinder has feedback action.
Oil pressure in each zone inside the calender roller
6. If the above adjustments still cannot solve the problem, it is necessary to disassemble the calender roller and check whether there are any abnormalities in the internal oil circuit and cylinder. This step usually requires service support from the calender roller manufacturer.
Flow system &forming
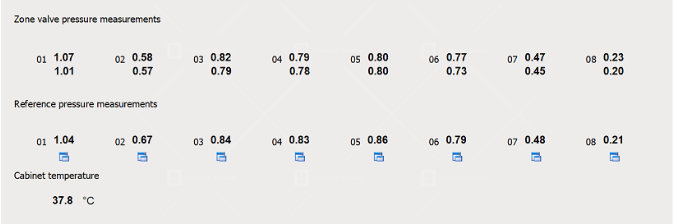
- Lip of headbox: The CD direction of the headbox is divided into N fine-tuning areas. We need to use special tools to detect the lip opening data corresponding to each fine-tuning area. The opening deviation of each adjacent fine-tuning mechanism is controlled within ±0.03mm. The opening of the 1-meter area on the operating side and the transmission side is slightly lower than the middle, so as to stabilize the subsequent production.
2. Dilution water valve opening: The concave and convex marks can be adjusted by fine-tuning the opening of the dilution water valve, but because the dilution water sprays onto the net after coming out of the lip, the three adjacent valves are generally fine-tuned to ensure accurate adjustment. The difference in the opening of each adjacent valve cannot exceed ±6.
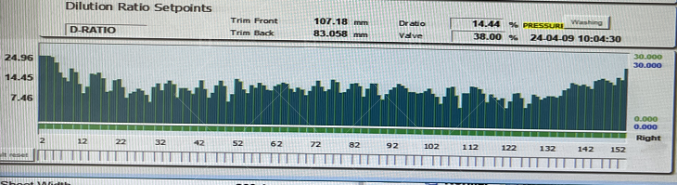
Dilution water valve opening curve
- Landing point and waterline:
The landing point is the position where the pulp flow falls on the forming plate after being ejected from the lip. We require the landing point to be in a straight line in the CD direction. Uneven landing points are generally caused by the opening of the lip and the abnormality of the forming plate.
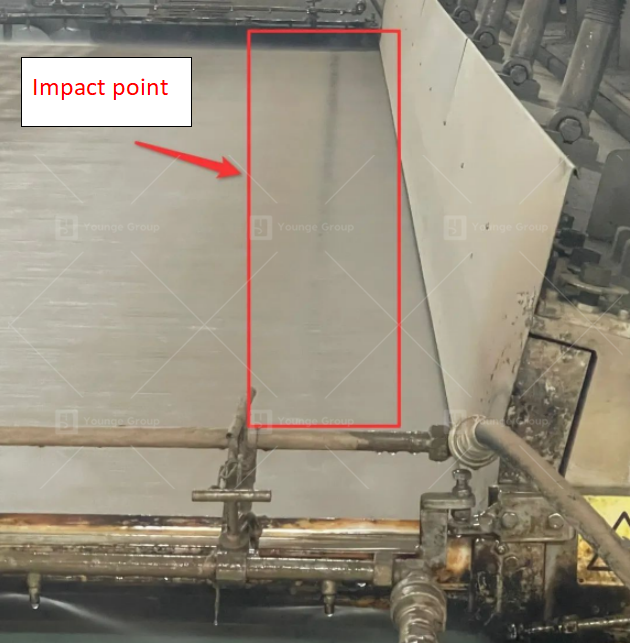
The point where the pulp flow hits the screen after being ejected from the lip
The waterline is the mirror-like water light that can be seen after the pulp flow reaches the net. As the dehydration progresses, this water-light will disappear, forming a clear dividing line in the CD direction. In principle, the waterline in the CD direction should be close to a straight line.
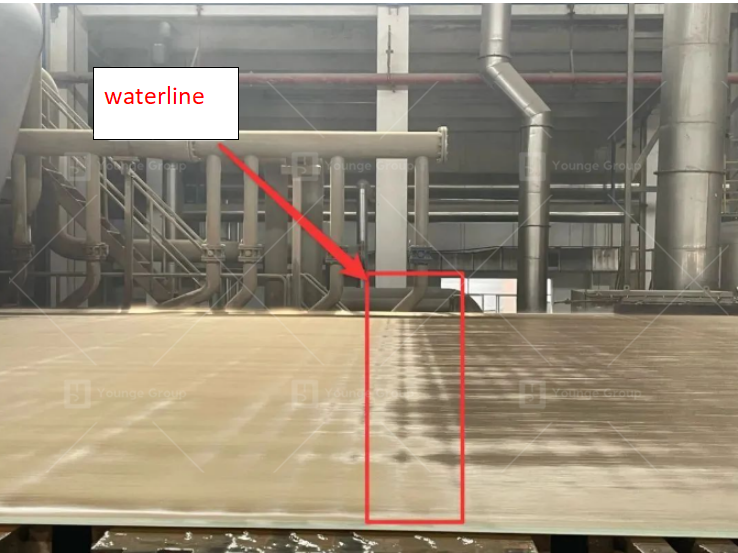
The visible waterline of the web forming
There are many reasons for uneven water lines and many ways to adjust them. I will not go into too much detail on routine inspections and adjustments here. I will focus on a reason that is easily overlooked: the gravity dehydration box deforms and sinks. Because of the materials used in the gravity dehydration box and the reasons for thermal expansion and contraction, the dehydration box is prone to deformation and sinking in the middle.

The deformation and sinking of the gravity dewatering box causes the waterline to be turbulent
When this problem occurs, the water line will also become disordered, which will affect the abnormal opening of the dilution water valve. To check whether this problem exists, it is necessary to check when the water is flowing through the screen and the vacuum is not turned on.